반응형
HTML5 마크업 요소 활용하기ㆍheaderㆍnavㆍsectionㆍasideㆍfooterㆍtime
웹사이트 화면을 구성하며 HTML div 태그만을 활용해 작성한 코드를 HTML5 마크업 요소를 변경하게 되면 브라우저에 어떠한 역활을 하는 웹페이지인지 목적을 알려줄 수 있다.
CSS에서 HTML5 마크업 요소는 어떠한 방식으로 선택하는지 그리고 HTML5 마크업 요소는 HTML로 어떻게 표현하면 되는지 간단히 예제 소스를 작성하였으며 다음에 필요한 경우 제가 활용하기 위한 목적도 있습니다.
<!DOCTYPE html>
<html>
 <head>
  <meta charset="utf-8">
  <title>div 레이아웃 대신 HTML5 요소 활용해 보기</title>
  <style>
	p{
		text-align:center;
		font-size: 25px;
		font-weight: bold;
	}
	#all{
		padding: 10px 10px 10px 10px;
		width: 100%;
	}
  	header{
		height: 100px;
		border: black 1px solid;
		background-color: rebeccapurple;
		margin: 10px;
	}
	ul{
		margin: 10px;
		display: inline-block;
		background-color: yellowgreen;
		width: 97%;
	}
	li{
		list-style-type: none;
		display: inline;
		font-weight: bold;
	}

	ul li.selected{
		background-color: #ffbc00;
	}
	section#left, section#center, aside{
		display: inline-block;
		margin: 10px;
	}
	a:link{
		text-decoration: none;
	}
	section#left{
		height: 580px;
		padding: 15px;
		width: 30%;
		background-color: cadetblue;
	    float: left;
	}
	section#center{
		height: 580px;
		padding: 15px;
		width: 30%;
		background-color: cornflowerblue;
	}
	aside{
		height: 580px;
		padding: 15px;
		width: 30%;
		background-color: darkslategrey;
		float: right
	}
	footer{
		height: 100px;
		border: black 1px solid;
		background-color: crimson;
		padding: 15px;
		margin: 10px;
		clear:right;
	}
  </style>
 </head>

 <body>
 <div id="all">
 	<header>
		<p>HEADER</P>
	</header>

	<nav>
		<ul>
			<li><a href="">홈</a></li>
			<li class="selected">1번 메뉴</li>
			<li><a href="">2번 메뉴</a></li>
			<li><a href="">3번 메뉴</a></li>
		</ul>
	</nav>

	<section id="left">
		<p>LEFT</P>
	</section>

	<section id="center">
		<p>
			CENTER
		</P>
		<p><time datetime="2021-04-16">2021/04/16</time></p>
	</section>

	<aside>
		<p>RIGHT</P>
	</aside>

	<footer>
		<p>FOOTER</P>
	</footer>
 </div>
 </body>
</html>
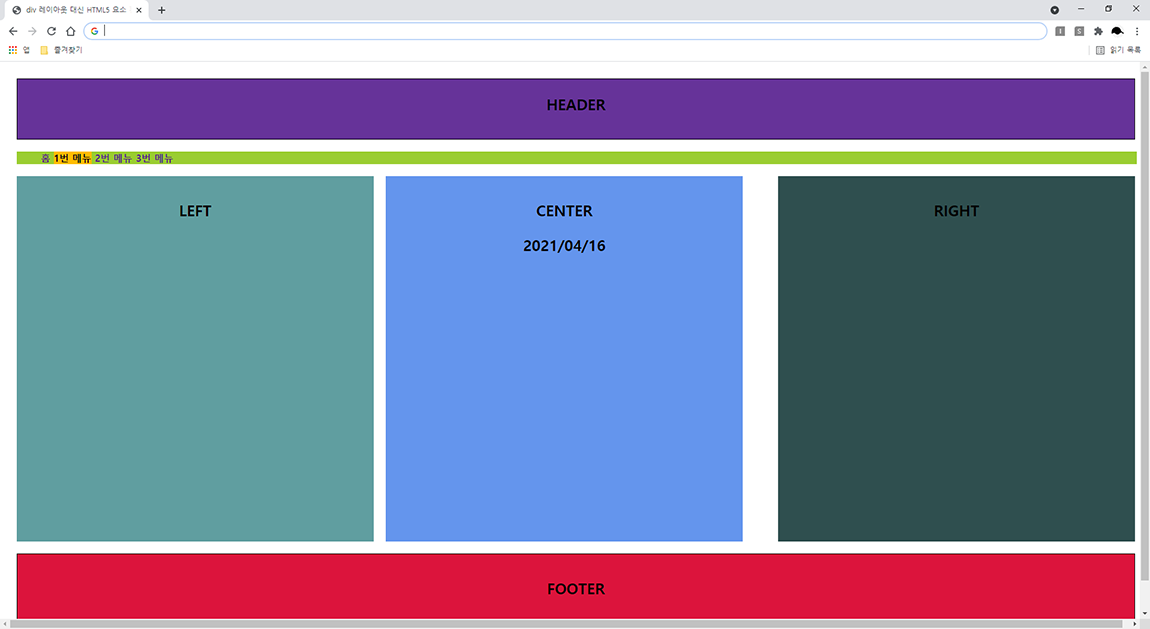
결과 화면

화면을 구성하며 이미 구성한 div 요소를 HTML5 마크업 요소로 변경하여 사용하지 않았는데 브라우저에게 어떠한 의미를 확실하게 전달해야 할 필요성이 있다고 판단될 땐 위와 같이 HTML5 마크업 요소를 활용해 변경해 코드를 작성할 수 있다는 부분을 기억하고 있으면 좋을 것 같다.
HTML5의 section만 코드를 작성하였으나 article과 section 태그 차이가 궁금하신 분들은 링크된 경로를 참고하시면 좋을 듯합니다. - aboooks.tistory.com/346
반응형


